Can you cut an LED strip anywhere?
With the wide application of LED strip lights in home decoration, more and more people choose to purchase whole rolls of 5M, 10M, 20M, or even 50M LED strips, hoping to flexibly cut them into the desired lengths for different spaces. But can you cut LED strips freely?
That depends on the type, voltage, and usage scenario. How to cut LED strips properly, how to customize the length you need, and how to reconnect and light them up afterward — letLEDWorker guide you through everything you need to know about cutting LED strip lights anywhere you want.

Types of LED Strip Lights
First, identify the type of LED strip you plan to purchase or already have. You need to confirm whether your LED strip can be cut — not all LED strips are cuttable.
Common cuttable LED strip types include: 2835 LED strips, 5050 LED strips, 3528 LED strips, 2216 LED strips, COB LED strips, and Neon LED strips.
High-voltage 220V LED strips can also be cut — some can be cut every 10 cm, while others every 1 meter. However, remember to apply proper waterproof sealing after cutting; otherwise, there’s a risk of electric shock!
LED Strip Cutting Intervals by Voltage
After confirming the type of LED strip, you also need to know the cutting intervals for strips with different voltages — 5V, 12V, and 24V.
(1) 5V LED Strips (e.g. WS2812B Addressable Strips)
Cutting Interval: One cutting point per LED (since the 5V voltage is low, each LED is powered independently).
Features: Ideal for precise control effects such as music rhythm lighting or running light displays. However, cutting at the wrong position will cause the following LEDs to stop working.
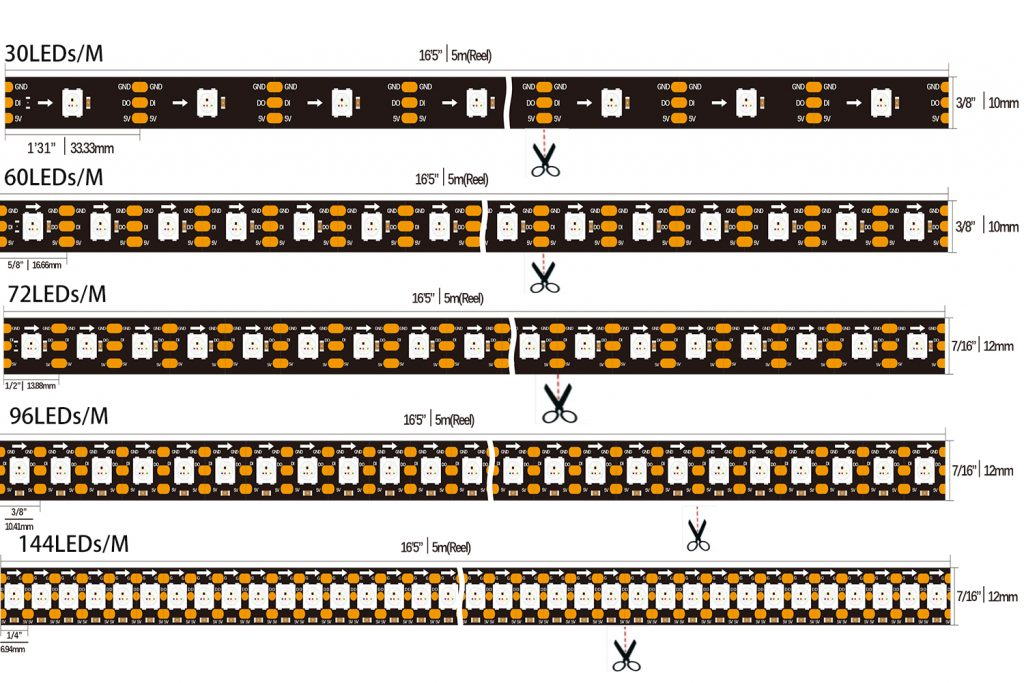
(2)12V LED Strips (Most Common Type)
Cutting Interval: Usually every 3 LEDs (can be cut at the copper solder pads).
For example, 2835 or 5050 LED strips with 60 LEDs per meter can be cut every 50mm.
Features: After cutting, each group of 3 LEDs can work independently.
If you cut in the middle of a group, that section of LEDs will not light up.

(3) 24V LED Strips (Suitable for Long Runs)
Cutting Interval: Usually every 6 LEDs (longer interval than 12V strips).
For example, a 24V 5050 LED strip with 60 LEDs per meter can be cut every 100 mm.

Cutting spacing of different LED bead models
| LED Type | Common Voltage | Cutting Spacing (LEDs per Group) | LEDs per Meter | Length per Group |
| 2835 | 12V/24V | 3 LEDs or 6 LEDs per Group | 60 LEDs/m | 50mm (12V) or 100mm (24V) |
| 5050 | 12V/24V | 3 LEDs or 6 LEDs per Group | 60 LEDs/m | 50mm (12V) or 100mm (24V) |
| 3528 | 12V | 3 LEDs per Group | 60 LEDs/m | 50mm |
| WS2812B (5V RGB) | 5V | 1 LED per Group (Each is Cuttable) | 30/60 LEDs/m | 33mm or 16mm |
How to Cut LED Strip Lights Properly
You’ll need a pair of scissors and a ruler. Measure the required length of the LED strip, then locate the solder pads on the PCB board and cut along the scissor icon or cutting mark.
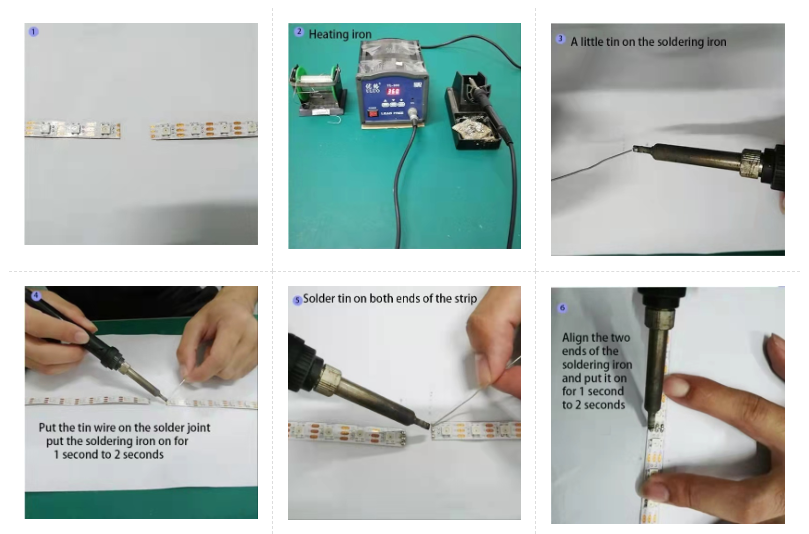
How to Connect LED Strips After Cutting
You can connect two sections of LED strips either by soldering or using connectors.
Soldering Connection (Precise and Reliable):
Use a soldering iron to join the copper pads with wires — suitable for those with experience.
Note: Keep the soldering time under 3 seconds to avoid damaging the LED chips with excessive heat.
Solderless Connector (Simple and Practical):
Choose a connector that matches the width of your LED strip (commonly 8mm or 10mm).
Insert the cut ends of the LED strips into the connector and press the clip to secure it. This method is ideal for beginners.
Precautions After Cutting
After cutting the LED strip, pay attention to the following points to ensure proper operation and safety:
- Power Voltage Matching:The strip’s voltage must match the power supply output (e.g., a 12V strip should be connected to a 12V power supply).
- Load Capacity Check: Make sure the power supply can handle the total length of the connected strips.
- Polarity Consistency: When connecting strips, ensure the positive and negative terminals are aligned correctly.
- Color Temperature Consistency: When splicing multiple sections, make sure the light color remains uniform and coordinated.
REQUEST A QUOTE
Whether you’re handling residential upgrades or large-scale commercial projects, choosing the right cuttable LED strip matters.
Talk to LW Lighting today for engineering-grade LED strip recommendations, custom lengths, and professional support for your installation.
FAQ
Cutting at the wrong position may cause the strip or certain LEDs to stop lighting and become non-functional.
You should not cut the strip arbitrarily — only cut at the copper solder pad marks. For example, 2835 and 5050 LED strips with 60 LEDs per meter can be cut every 10 cm. If you cut in the middle of a section, that group of LEDs will not light up.
Cutting at the wrong position, insufficient power supply capacity, or reversed polarity connection can all cause the LED strip to fail to light up.
- Look for the scissor icon or cutting line: Most cuttable LED strips have small scissor symbols or visible cutting lines between the copper pads. These marks indicate safe cutting points.
- Check the manufacturer’s datasheet or packaging: It usually specifies whether the strip can be cut and the cutting interval (e.g., every 3 LEDs or every 5 cm).
- Identify visible gaps and copper pads: You’ll often see tiny gaps between LED segments with exposed copper pads — these are the designated cutting areas.
- Contact your supplier if unclear: If the product itself doesn’t clearly indicate the cutting points, consult your supplier for confirmation.
- Verify voltage and type: For example, 12V LED strips can typically be cut every 3 LEDs, while 24V strips can be cut every 6 LEDs.
- COB LED strips are also cuttable: However, check carefully since the cutting distance may vary by model.
- AC (high-voltage) LED strips: These can usually be cut every 1 meter, but you must properly insulate and protect the cut ends to prevent electric shock.
- Do not cut if uncertain: Cutting without proper guidance may damage the strip or create a safety hazard.
If you’re unsure, you can send a product photo to